Knowledge base article
Optimising Wordfence firewall and security settings
View other technical support articles
Related articles
Basic WordPress security and site management
How did my WordPress website get hacked? What do I do?
Remove Wordfence firewall block via MySQL CLI
Other technical support articles
A beginners guide to email spoofing
Accessing your site before changing DNS
An introduction to email authentication
Basic WordPress security and site management
Check MySQL database table disk usage
Configure object cache with memcached and Litespeed Cache plugin
Configure spam filtering in cPanel
Connect via SFTP using SSH key authentication with FileZilla
Connecting to Serversaurus shared hosting via SFTP
Create a clone of your website
Create a SSH key pair and configure your SSH key in cPanel
Create a WordPress administrator via MySQL CLI
Create a WordPress administrator via phpMyAdmin
Create a WordPress cron task in cPanel
Disable automatic WordPress updates via wp-config.php
Download or restore individual files, directories or database backups with JetBackup
Enabling PHP extensions, Changing PHP Version and Setting PHP Options
Export or Import a MySQL database via CLI
Force HTTPS via .htaccess (cPanel)
Getting Started with Anycast DNS
Getting Started with the Content Delivery Network (CDN)
Getting Started with Virtual Machines
Go live with your WordPress staging website
Help! I need a backup of my cPanel-hosted website
Hide .html extension using .htaccess
How did my WordPress website get hacked? What do I do?
How to ensure website generated emails are delivered successfully
How to issue a Let’s Encrypt certificate
How to remove Site Software management
I can receive email but can’t send!
Introduction to LiteSpeed Cache
Manage DNS zones with the cPanel Zone Editor
Manual WordPress migrations in a nutshell
Migrate remote staging website to local hosting server
Migrate remote transactional website to local server
Migrating email from one POP/IMAP email account to another
My site and/or email service is down
Network Firewall (I can’t access my services on a non-standard port)
Pointing your domain to Serversaurus
Pointing your domain to Squarespace with cPanel
Prevent website generated spam with CAPTCHA
Push updates from a staging to production website
Reconfigure production website to subdomain
Recover your hacked WordPress website
Remove Wordfence firewall block via MySQL CLI
Secure your WordPress installation
Setting up email on your iPhone
Subdomains for test sites & more
Unable to renew certificate: The Let’s Encrypt HTTP challenge failed
Understanding CloudLinux resource limits
Update a WordPress website to use a new domain name
Update your WordPress username via phpMyAdmin
Using Serversaurus’ nameservers but hosting your email elsewhere
Using the Serversaurus Cloud CDN with your WordPress website
This guide recommends the best configurations to optimise Wordfence firewall and security settings for WordPress
Wordfence is a powerful firewall and security plugin offering a range of protection settings to strengthen WordPress application security and resilience against web attacks.
To enhance the protection Wordfence offers, we've compiled our recommended Wordfence configuration settings which are verified by our WordPress Management team as highly beneficial.
Note: This guide recommends configurations for the free version of WordPress so no premium Wordfence features will be referenced.
Let's begin!
- Login to WordPress and navigate to the Wordfence dashboard. If you've not yet installed Wordfence, you can download Wordfence free on WordPress.org.
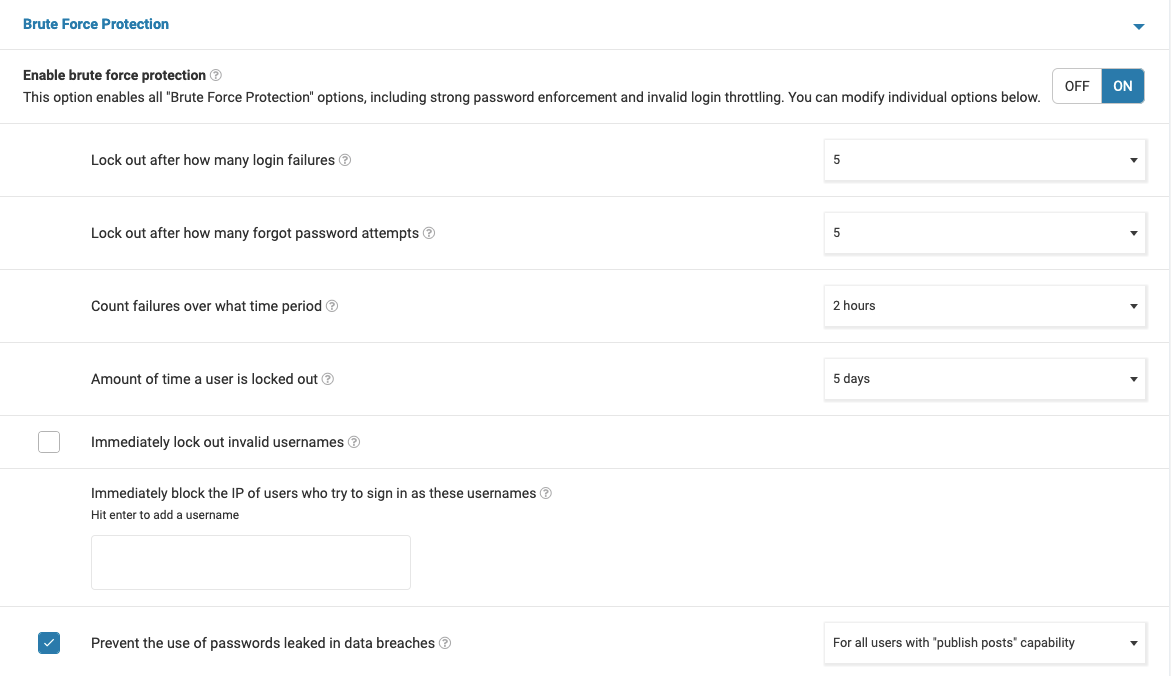
- Select All Options on the left hand side tool bar, then navigate to the Brute Force Protection section and set the following parameters:
Enable brute force protection >> ON
Lock out after how many login failures >> 5
Lock out after how many forgot password attempts >> 5
Count failures over what time period >> 2 hours
Amount of time a user is locked out >> 5 days
Prevent the use of passwords leaked in data breaches >> Enabled For all users with "publish posts" capability.
Leave the remaining default settings in this section as is.
To assist implementing these recommendations, you can also reference the following visual representation of the settings: - Scroll down to the next section labelled Rate Limiting and set the following parameters:
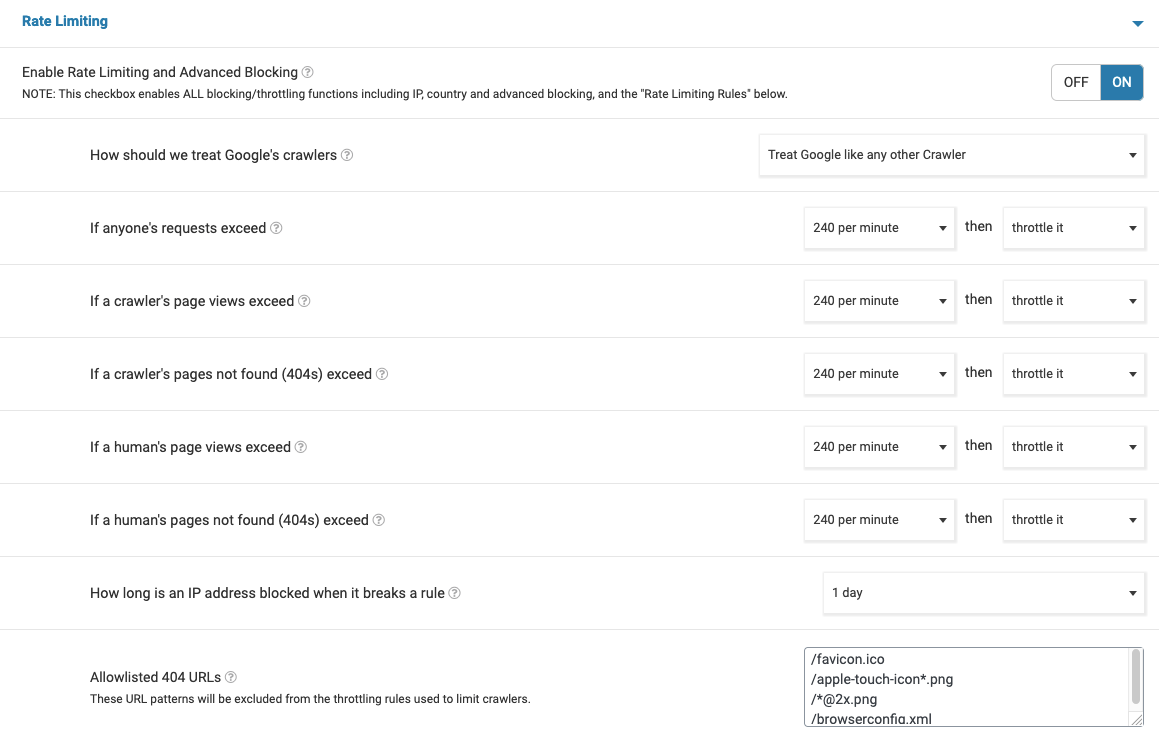
Enable Rate Limiting and Advanced Blocking >> ON
How should we treat Google's crawlers >> Treat Google like any other Crawler
If anyone's requests exceed >> 240 per minute then throttle it
If a crawler's page views exceed >> 240 per minute then throttle it
If a crawler's pages not found (404s) exceed >> 240 per minute then throttle it
If a human's page views exceed >> 240 per minute then throttle it
If a human's pages not found (404s) exceed >> 240 per minute then throttle it
How long is an IP address blocked when it breaks a rule >> 1 day
You can also reference the following visual representation of the settings: - Select SAVE CHANGES.
These recommendations are curated after hands on experience with hundreds of WordPress applications however these settings are always best tailored to your needs so adjust the settings as necessary.
Last updated November 30, 2023