Knowledge base article
Configure spam filtering in cPanel
Related articles
An introduction to email authentication
Emptying Trash, Junk and Spam files
How to ensure website generated emails are delivered successfully
Other email articles
A beginners guide to email spoofing
Add or remove Google Workspace users
An introduction to email authentication
Configure your cPanel email account in Gmail
Create and manage email accounts in cPanel
Create Autoresponders in cPanel
Download or restore individual files, directories or database backups with JetBackup
Emptying Trash, Junk and Spam files
How to ensure website generated emails are delivered successfully
How to whitelist an email address
I can receive email but can’t send!
Manage DNS zones with the cPanel Zone Editor
Migrating email from one POP/IMAP email account to another
My site and/or email service is down
Network Firewall (I can’t access my services on a non-standard port)
Prevent website generated spam with CAPTCHA
Setting up email on your iPhone
The SLA – Best effort versus 99.9% versus 100%
Understanding CloudLinux resource limits
Using Serversaurus’ nameservers but hosting your email elsewhere
This article will guide you through using the Spam Filters function in cPanel
Spam Filters is a great feature in cPanel which allows you to adjust how incoming mail is being handled by your cPanel account. If you're experiencing issues with spam, a good first step to getting your spam issue under control is adjusting your Spam Filters settings to be more aggressive when identifying spam.
Let's get started! To follow this guide you need your cPanel login credentials. If you have forgotten your cPanel credentials, they were included in the original Welcome to Serversaurus or IMPORTANT: Hosting Documentation email which you should find in your inbox, otherwise follow these instructions on how to update your cPanel password.
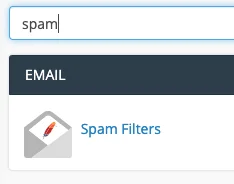
- Login to cPanel and navigate to the Spam Filters function, use the search bar to assist you

- Enable the Spam Filter by selecting the button next to Process New Emails and Mark them as Spam

- To adjust the spam filters to be more or less aggressive, select Spam Threshold Score, then choose your preference from the drop down list, 10 being the least aggressive and 1 being the most

- To continue configuring the spam filter, select Return to "Overview"

- Choose from the options available, such as enabling Move New Spam to a Separate Folder (Spam Box) or Automatically Delete New Spam (Auto-Delete). You can also whitelist or blacklist email addresses, by navigating to the Additional Configurations (For Advanced Users) and adding email addresses or domains to the whitelist or blacklist.
If after adjusting the spam filter settings your issues persist, sometimes the inbuilt cPanel spam filter is not advanced enough to tackle all spam, so consider our SpamExperts Professional Spam Filter which is an addon available for your cPanel account or a dedicated email service such as our Dedicated Email Hosting or Google Workspace which both have excellent inbound spam filtering.
Published April 26, 2019. Last updated November 30, 2023.
Can't find what you're looking for?
"*" indicates required fields