Knowledge base article
Using Serversaurus’ nameservers but hosting your email elsewhere
Related articles
Accessing your site before changing DNS
Manage DNS zones with the cPanel Zone Editor
Other email articles
A beginners guide to email spoofing
Add or remove Google Workspace users
An introduction to email authentication
Configure spam filtering in cPanel
Configure your cPanel email account in Gmail
Create and manage email accounts in cPanel
Create Autoresponders in cPanel
Download or restore individual files, directories or database backups with JetBackup
Emptying Trash, Junk and Spam files
How to ensure website generated emails are delivered successfully
How to whitelist an email address
I can receive email but can’t send!
Manage DNS zones with the cPanel Zone Editor
Migrating email from one POP/IMAP email account to another
My site and/or email service is down
Network Firewall (I can’t access my services on a non-standard port)
Prevent website generated spam with CAPTCHA
Setting up email on your iPhone
The SLA – Best effort versus 99.9% versus 100%
Understanding CloudLinux resource limits
This article will teach you how to update your domain to use Serversaurus nameservers but retain your external email hosting
1. Determine what your current MX records are
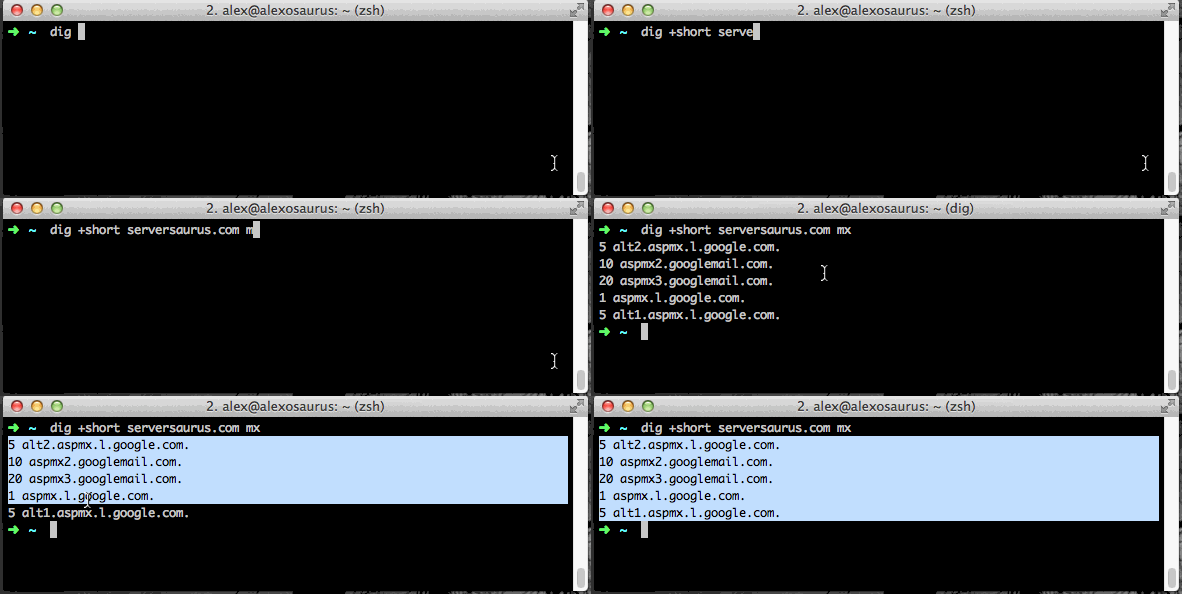
You will need to figure out what the MX records (which instruct mail servers and clients about where a domain's email service is hosted).
You can do this either on a terminal on Mac OS X or UNIX-like systems (via `dig +short your-domain.com.au mx`)

Or you can look it up online using a tool such as MXToolbox. In either case, copy the records down somewhere.
2. Setup the MX records in cPanel
Login to your cPanel account. If you have forgotten your cPanel credentials, they were included in the original Welcome to Serversaurus or IMPORTANT: Hosting Documentation email which you can find in your inbox ,otherwise follow the instructions on how to update your cPanel password.
Navigate to the Zone Editor function, using the Find function in cPanel to help you.

You should now view a list of the domains hosted under your account. To the right of the domain you want to update, select Manage.
Delete any current MX records and then re-enter all of the MX records you copied down previously.
You can add your new MX records by selecting Add Record and enter the previously copied records into the appropriate fields.
3. Update your mail routing to Remote.
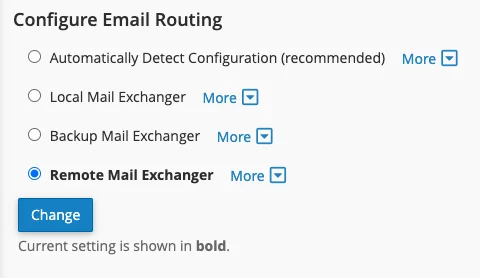
For the server to route to a remote mail server we need to update the email routing settings, you can do this by navigating to the Email Routing function in cPanel.
Select your domain from the drop down list, then select Remote Mail Exchanger under Configure Email Routing.

4. Update your nameservers
At your registrar change your nameservers for the domain to:
ns1.serversaurus.com
ns2.serversaurus.com
ns3.serversaurus.com
ns4.serversaurus.com
Once those steps are complete, your mail will continue to be delivered to the current mail provider without any downtime!
Published November 25, 2020. Last updated November 30, 2023.
Can't find what you're looking for?
"*" indicates required fields