Knowledge base article
Push updates from a staging to production website
Related articles
Accessing your site before changing DNS
Migrate remote transactional website to local server
Pointing your domain to Serversaurus
Other cpanel articles
A beginners guide to email spoofing
Accessing your site before changing DNS
An introduction to email authentication
Basic WordPress security and site management
Can I test out your services for free?
Check MySQL database table disk usage
Configure object cache with memcached and Litespeed Cache plugin
Configure spam filtering in cPanel
Configure your cPanel email account in Gmail
Connect via SFTP using SSH key authentication with FileZilla
Connecting to Serversaurus shared hosting via SFTP
Create a clone of your website
Create a SSH key pair and configure your SSH key in cPanel
Create a WordPress administrator via MySQL CLI
Create a WordPress administrator via phpMyAdmin
Create a WordPress cron task in cPanel
Create and manage email accounts in cPanel
Create Autoresponders in cPanel
Disable automatic WordPress updates via wp-config.php
Domain options for shared hosting
Download or restore individual files, directories or database backups with JetBackup
Emptying Trash, Junk and Spam files
Enabling PHP extensions, Changing PHP Version and Setting PHP Options
Export or Import a MySQL database via CLI
Force HTTPS via .htaccess (cPanel)
Go live with your WordPress staging website
Help! I need a backup of my cPanel-hosted website
Hide .html extension using .htaccess
How did my WordPress website get hacked? What do I do?
How to ensure website generated emails are delivered successfully
How to issue a Let’s Encrypt certificate
How to remove Site Software management
I can receive email but can’t send!
Install and configure Ghost blog in cPanel using Apache Reverse Proxy with mod_proxy
Install or manage complimentary SSL certificates with AutoSSL
Introduction to LiteSpeed Cache
Login to cPanel via the Client Portal
Manage DNS zones with the cPanel Zone Editor
Manual WordPress migrations in a nutshell
Migrate remote staging website to local hosting server
Migrate remote transactional website to local server
Migrating email from one POP/IMAP email account to another
My site and/or email service is down
Network Firewall (I can’t access my services on a non-standard port)
Pointing your domain to Serversaurus
Pointing your domain to Squarespace with cPanel
Prevent website generated spam with CAPTCHA
Reconfigure production website to subdomain
Recover your hacked WordPress website
Remove Wordfence firewall block via MySQL CLI
Secure your WordPress installation
Setting up email on your iPhone
Subdomains for test sites & more
The SLA – Best effort versus 99.9% versus 100%
Unable to renew certificate: The Let’s Encrypt HTTP challenge failed
Understanding CloudLinux resource limits
Update a WordPress website to use a new domain name
Update your WordPress username via phpMyAdmin
Using the Serversaurus Cloud CDN with your WordPress website
What exactly is shared hosting?
Why don’t you have unlimited plans?
WordPress install still shows Serversaurus “new customer” landing page
WordPress: Setting up WP Fastest Cache
This guide will teach you how to synchronise all changes in staging with production
This guide is for WordPress websites however the steps can be easily adjusted for most content management systems.To complete this guide, please ensure you have:
- Your cPanel login credentials If you have forgotten your cPanel credentials, they were included in the original Welcome to Serversaurus or IMPORTANT: Hosting Documentation email which you should find in your inbox, otherwise follow our instructions on updating your cPanel password.
- A WordPress administrator login To login to WordPress please ensure you have a WordPress administrator username and password.
Let’s get started!
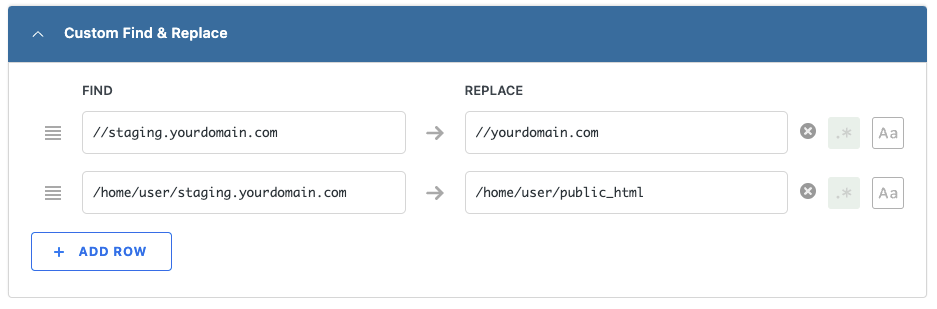
- Using the WP Migrate Lite plugin, we will perform a find & replace and export the staging website database. For the find and replace, we will update the database to use the production domain and directory path.Login to WordPress dashboard and navigate to Plugins >> Add New >> Install WP Migrate Lite >> Activate Plugin. Then continue to Tools >> WP Migrate >> Migrate >> Export. Update the Replace fields with the production domain and new directory path, for example:
 Select Export. The database export will be automatically downloaded to your computer.Tip: If there are website functions collecting data on the production website, for example a contact form which is storing submission information in the database, you can exclude the contact form database tables from the export to ensure the submission data on production remains untouched when the database is imported. You can exclude database tables within the Migrate >> Export settings, under Database >> Tables.
 - To import the database, login to cPanel and open phpMyAdmin.Select the production database from the left hand side and navigate to the Import tab, select Choose file to upload the database export, then select Import at the bottom of the page.Tip: If you’re unsure which is the production database, you can confirm these details within the wp-config.php file within the document root for the production website.
- Next we will synchronise any file changes, to begin open the Terminal function in cPanel.We will use the rsync command to synchronise new or changed files from the source (staging) to the destination (production) directory.Our command excludes any site specific configuration files.Please update the below command, where staging.yourdomain.com/ is the staging website document root (this is usually labelled as your staging domain), and public_html/ is the document root for your production website, you can confirm your domain document root from the Domains cPanel function if required.
rsync -av --exclude 'wp-config.php' --exclude '.htaccess' --exclude 'wordfence-waf.php' --exclude '.user.ini' --exclude 'error_log' staging.domain.com/ public_html/When ready, copy/paste the command into the Terminal window and select Enter on your keyboard to initiate the command. While the rsync task is in progress, the command output will show the file transfer progress, when the tasks completes, the Terminal window will look similar to below: Well done! All staging updates have been pushed to production. If caching is enabled, you’ll need to clear all cache to see the latest version. If there’s any issues, use the troubleshooting recommendations below to assist you.
- Login to WordPress and clear all website cache.
- Check DNS is resolving to correct server IP address.
- Login to phpMyAdmin, check wp_options table and confirm the siteurl and home are pointing to the correct domain name – update if required.
- Check all PHP dependencies are enabled.
- If all fails, use the JetBackup function in cPanel to restore an earlier version of the website.
Published September 28, 2023. Last updated February 26, 2026.
"*" indicates required fields