Knowledge base article
WordPress: Setting up WP Fastest Cache
Related articles
Configure object cache with memcached and Litespeed Cache plugin
Getting Started with the Content Delivery Network (CDN)
Other cpanel articles
A beginners guide to email spoofing
Accessing your site before changing DNS
An introduction to email authentication
Basic WordPress security and site management
Can I test out your services for free?
Check MySQL database table disk usage
Configure object cache with memcached and Litespeed Cache plugin
Configure spam filtering in cPanel
Configure your cPanel email account in Gmail
Connect via SFTP using SSH key authentication with FileZilla
Connecting to Serversaurus shared hosting via SFTP
Create a clone of your website
Create a SSH key pair and configure your SSH key in cPanel
Create a WordPress administrator via MySQL CLI
Create a WordPress administrator via phpMyAdmin
Create a WordPress cron task in cPanel
Create and manage email accounts in cPanel
Create Autoresponders in cPanel
Disable automatic WordPress updates via wp-config.php
Domain options for shared hosting
Download or restore individual files, directories or database backups with JetBackup
Emptying Trash, Junk and Spam files
Enabling PHP extensions, Changing PHP Version and Setting PHP Options
Export or Import a MySQL database via CLI
Force HTTPS via .htaccess (cPanel)
Go live with your WordPress staging website
Help! I need a backup of my cPanel-hosted website
Hide .html extension using .htaccess
How did my WordPress website get hacked? What do I do?
How to ensure website generated emails are delivered successfully
How to issue a Let’s Encrypt certificate
How to remove Site Software management
I can receive email but can’t send!
Install and configure Ghost blog in cPanel using Apache Reverse Proxy with mod_proxy
Install or manage complimentary SSL certificates with AutoSSL
Introduction to LiteSpeed Cache
Login to cPanel via the Client Portal
Manage DNS zones with the cPanel Zone Editor
Manual WordPress migrations in a nutshell
Migrate remote staging website to local hosting server
Migrate remote transactional website to local server
Migrating email from one POP/IMAP email account to another
My site and/or email service is down
Network Firewall (I can’t access my services on a non-standard port)
Pointing your domain to Serversaurus
Pointing your domain to Squarespace with cPanel
Prevent website generated spam with CAPTCHA
Push updates from a staging to production website
Reconfigure production website to subdomain
Recover your hacked WordPress website
Remove Wordfence firewall block via MySQL CLI
Secure your WordPress installation
Setting up email on your iPhone
Subdomains for test sites & more
The SLA – Best effort versus 99.9% versus 100%
Unable to renew certificate: The Let’s Encrypt HTTP challenge failed
Understanding CloudLinux resource limits
Update a WordPress website to use a new domain name
Update your WordPress username via phpMyAdmin
What exactly is shared hosting?
Why don’t you have unlimited plans?
WordPress install still shows Serversaurus “new customer” landing page
This article will give you instructions on how to install WP Fastest Cache

For most Wordpress websites, the quickest and easiest way to get a major performance improvement is to install a caching plugin. There are many available through the Wordpress Plugin Directory, and you can install them directly within Wordpress.
Background
Caching - what's that?
cache, noun [pr: kash] a place where things are hidden
About caching and why it works so well for your Wordpress website.
By default, every time a visitor accesses a page on your website, Wordpress executes php programs, comprised of tens or hundreds of individual php files, to build the requested page. These php programs take your content and your selected theme, along with any customisations that are performed by your plugins - also php programs, and run them to generate the page. Some of your content can also be generated by these plugins. This means that the server has to access hundreds or even thousands of files, and then run the php programs, every time a page is accessed.
For the vast majority of websites, because the content on each page changes rarely*, caching plugins can give a huge speedup by saving a copy of the fully-built page to a cache directory on the server when it is first built. Until the page changes again, or for a predefined period, this copy will instantly be returned in response to requests for this page, without it having to be built again. This avoids the thousands of files being loaded and the programs executed on the server.
* When it comes to websites, "rarely" can mean a long time, or very short period of time, depending the number of visitors to the website. A website that is updated as often as once per day and has 100 visitors a day, saves the page being built 99 out of 100 times. A website that has 100,000 visitors per minute, and is updated every minute, can save the page being generated 99,999 out of 100,000 times.
Installing WP Fastest Cache
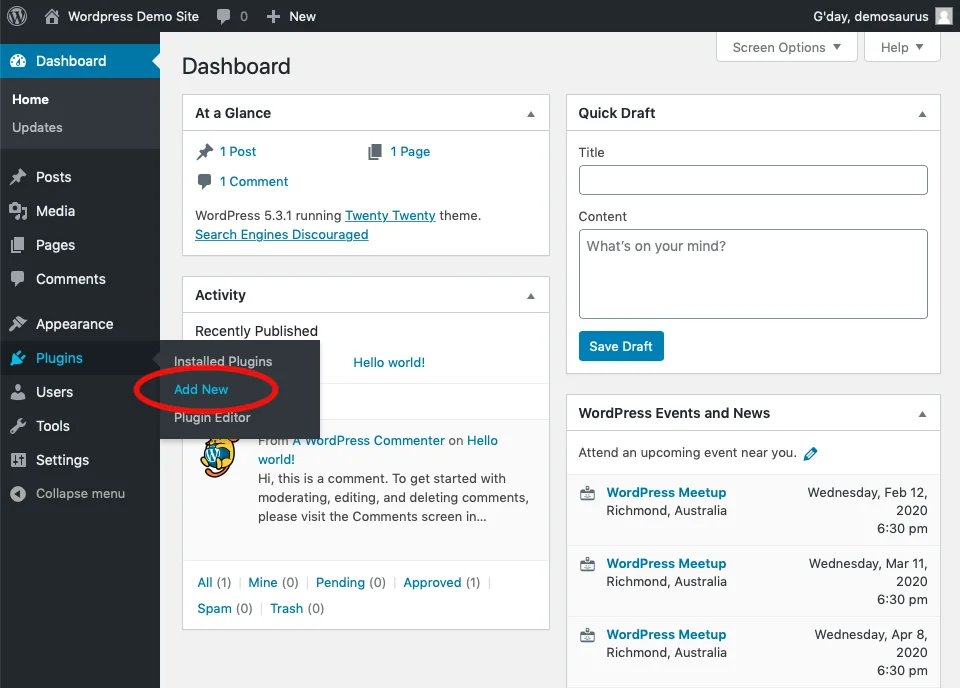
- Login to your Wordpress Admin page, and choose Add New under the Plugins menu.
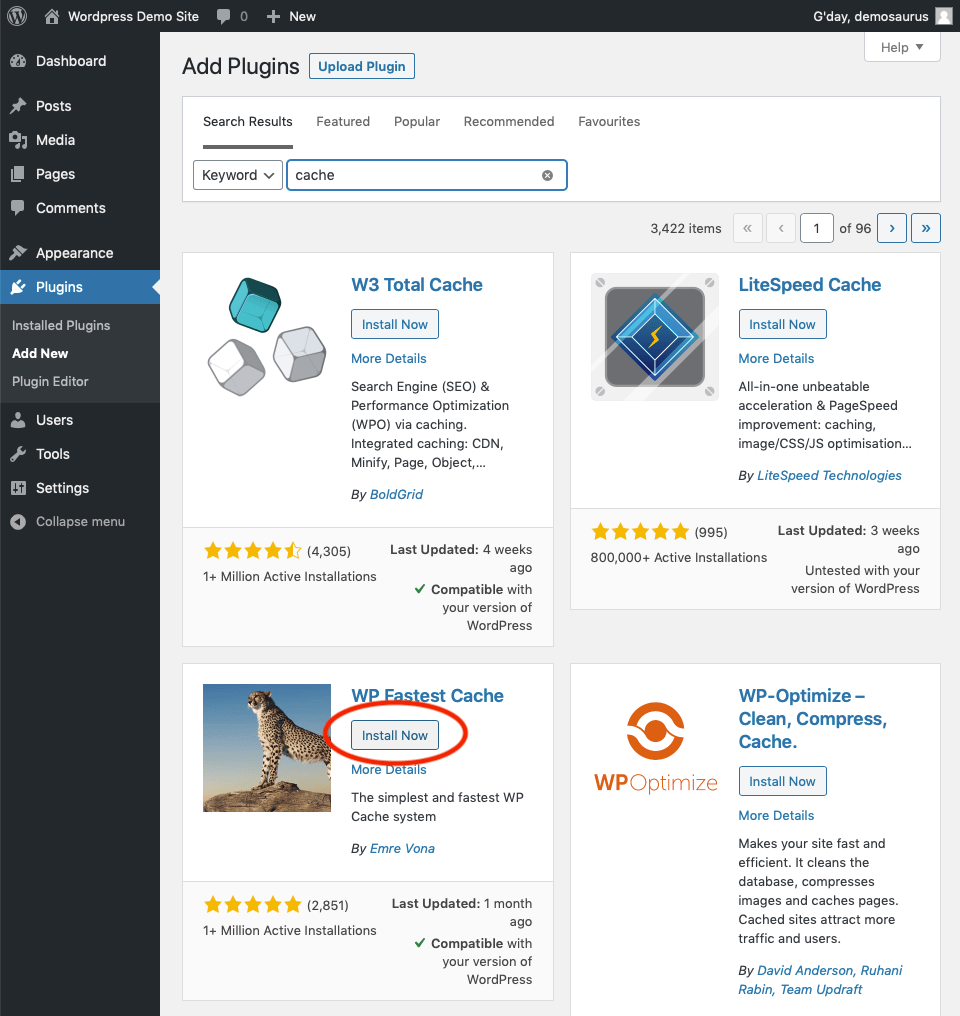
- Enter "cache" in the keyword box. Click the Install Now button for WP Fastest Cache.
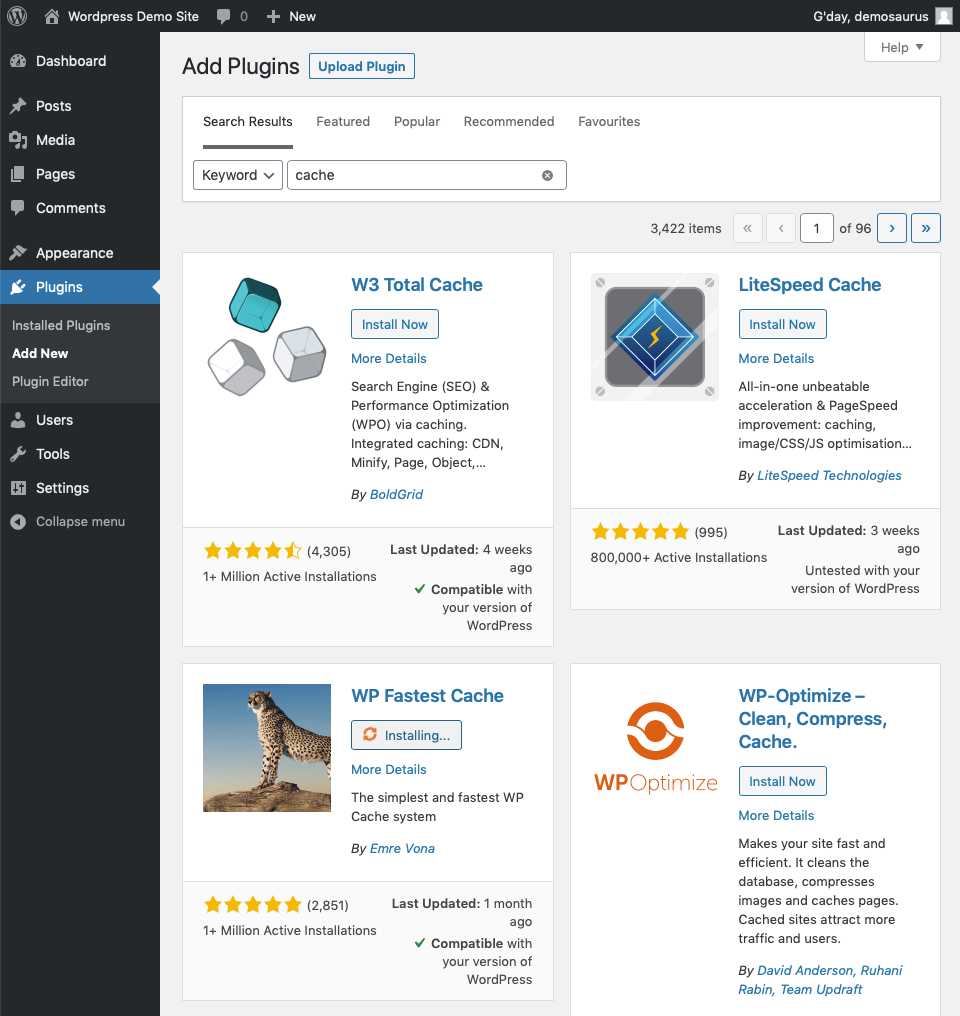
- Wait while WP Fastest Cache is installed.
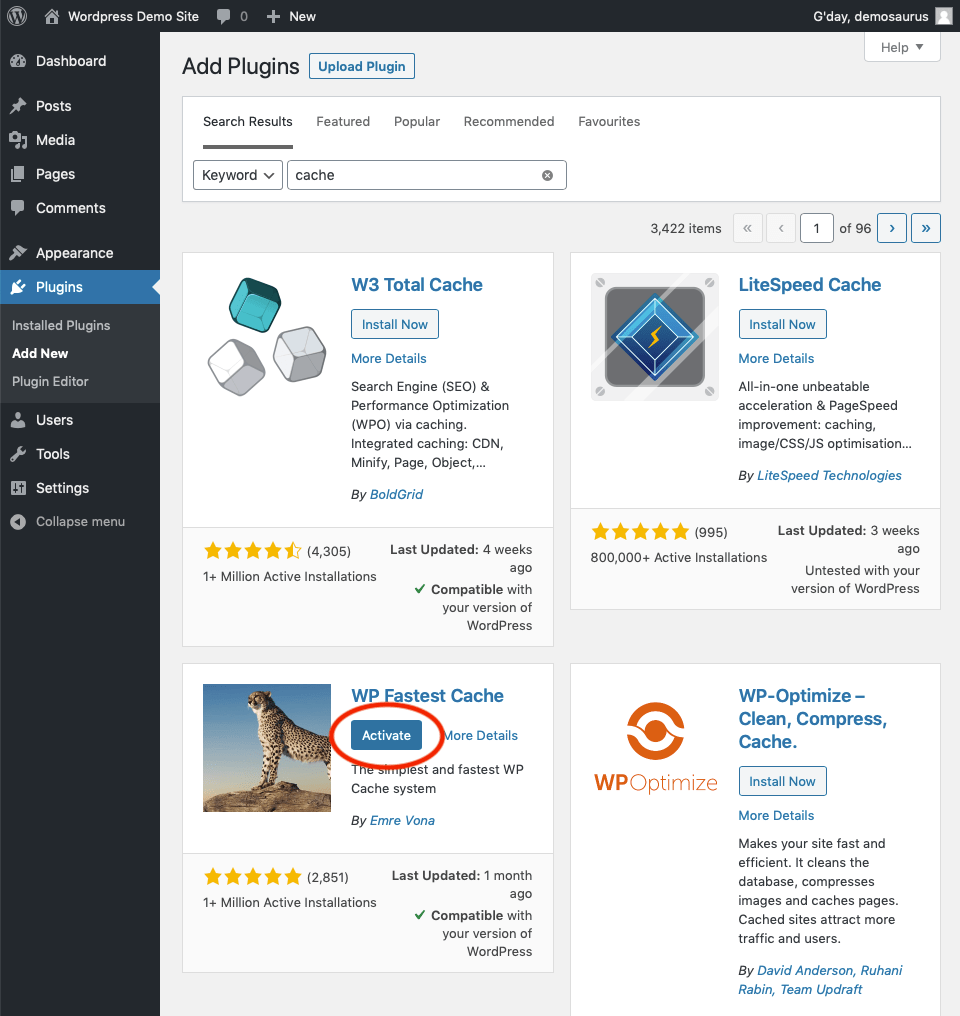
- Click the Activate button for WP Fastest Cache.
- When the plugin is activated, you'll see a confirmation message and will be on the Installed Plugins page. You'll also see WP Fastest Cache in the left-hand menu.
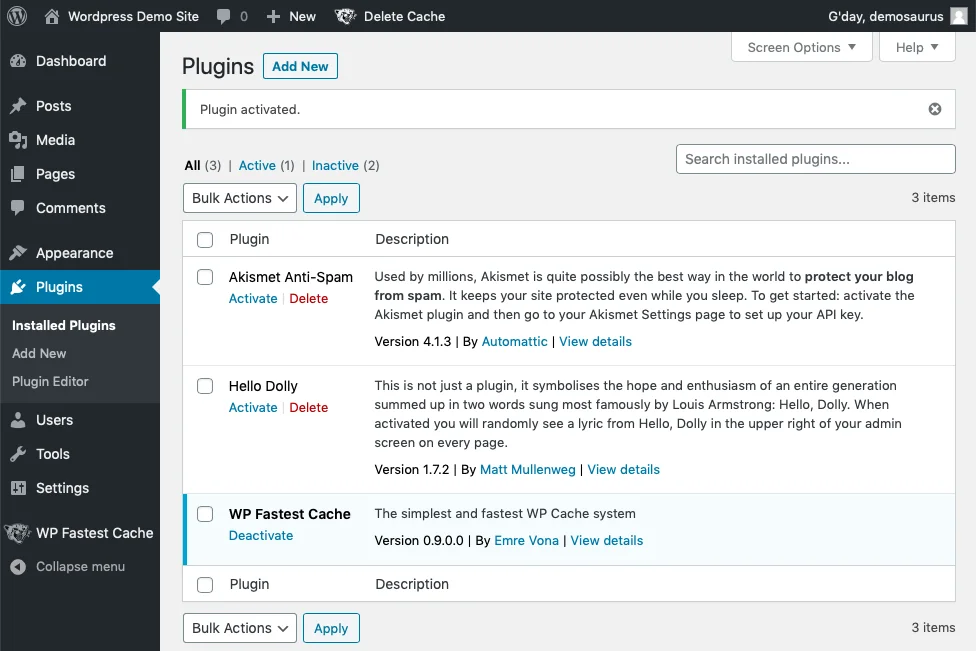
Configuring WP Fastest Cache.
- Click WP Fastest Cache in the left hand menu. You'll see the Options page for the plugin.
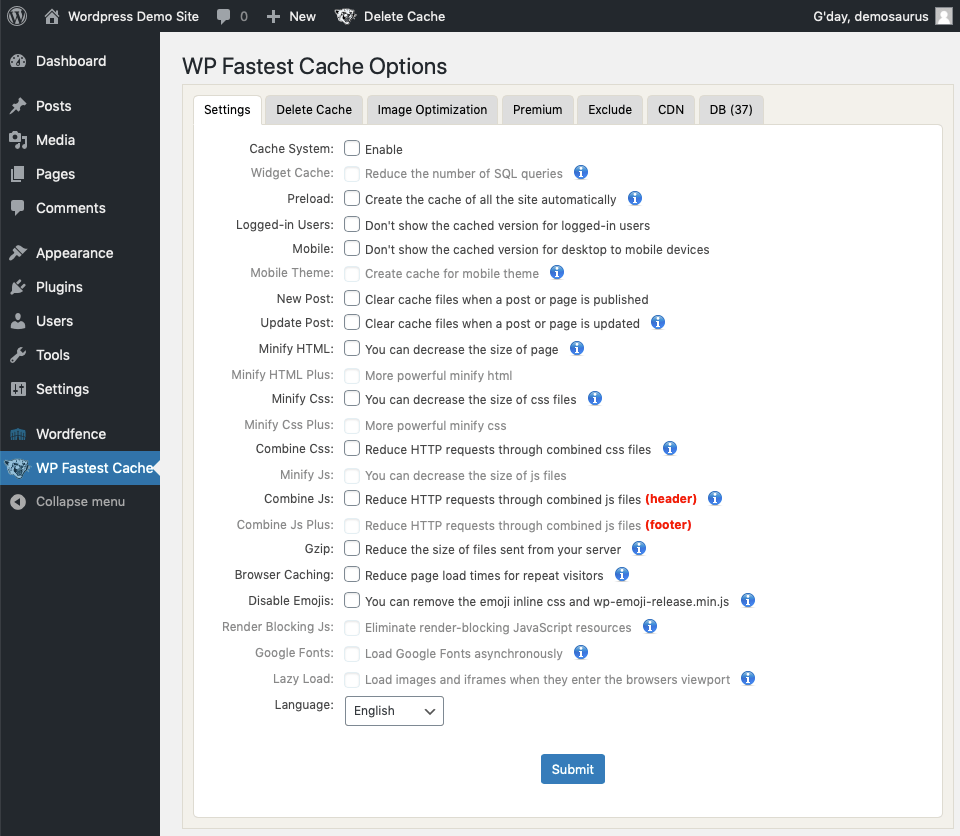
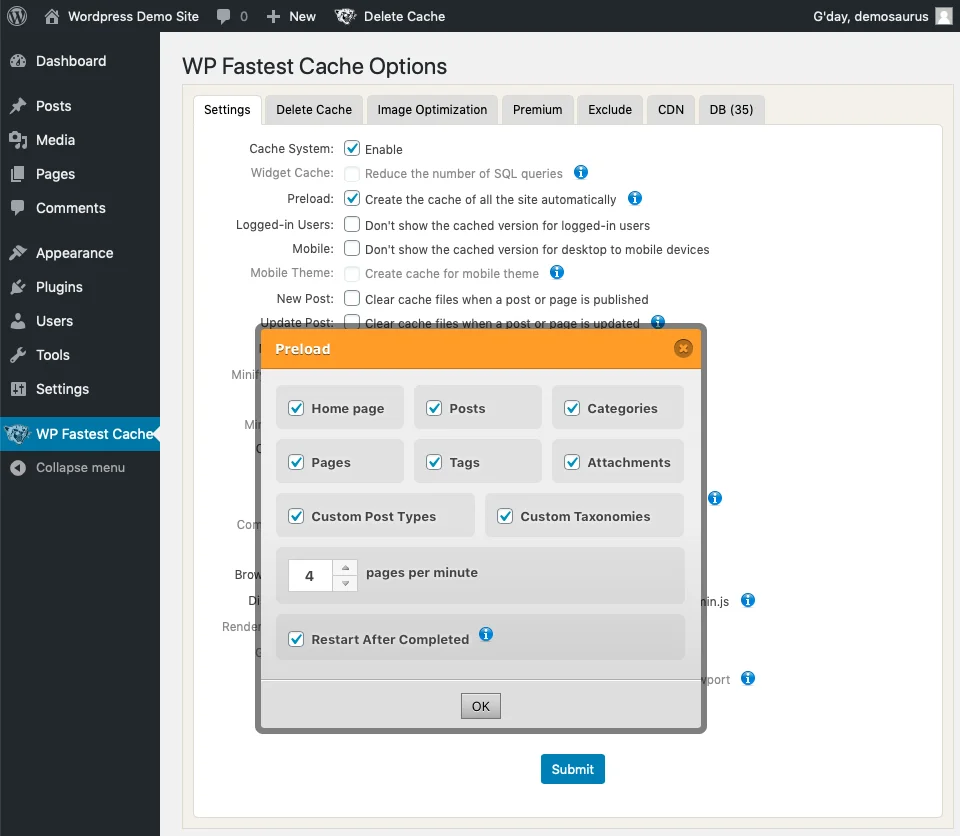
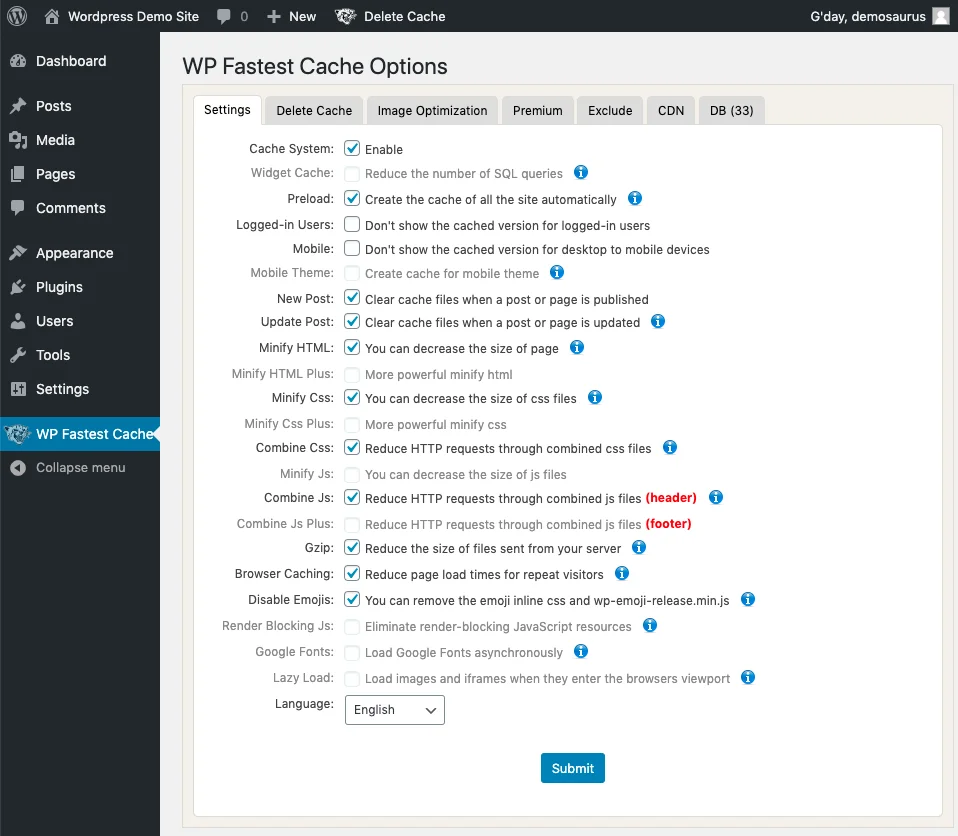
- Take note of the setting Preload. This setting is best applied when managing cache for a high traffic website, if your website is low traffic this setting will cause a greater overhead of CPU usage- so take into consideration which setting is appropriate for your website, our screenshot displays settings we've applied to a high traffic site, if your website is low traffic we recommend leaving Preload Disabled.
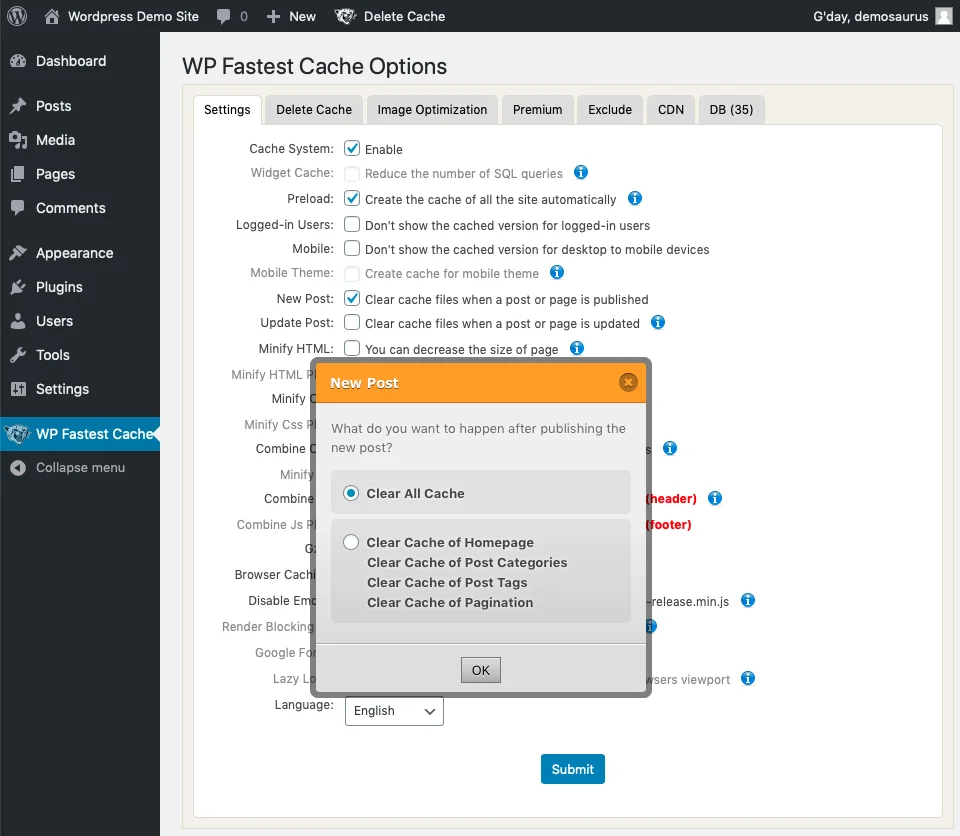
- Click New Post. The options panel for New Post will show. The default options are preferred, so click OK.
- Click Update Post. The options panel for Update Post will show. The default options are preferred, so click OK.
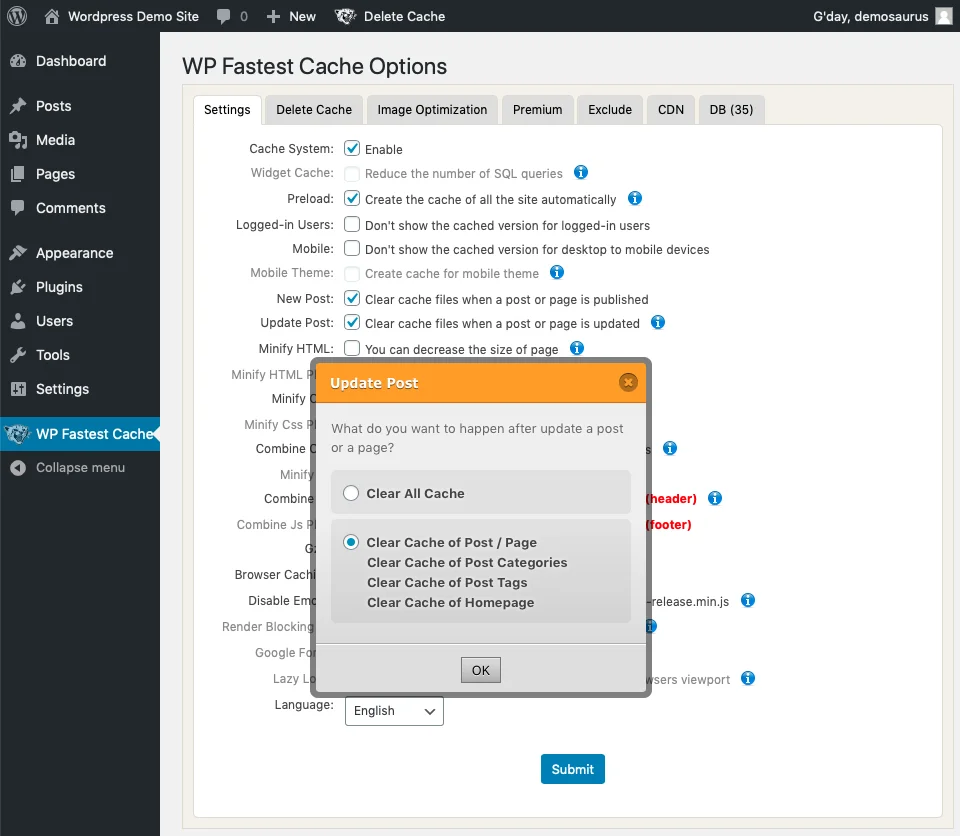
- Click Minify HTML, Minify Css[1], Combine Css[1], Combine Js, Gzip [2], Browser Caching and Disable Emojis. Click Submit.
Notes
[1] Some sites may have issues with Combine Css, Combine JS, or both. Check your site after enabling these options to ensure it still looks and works the same as it did previously.
[2] Gzip will require the gzip module for php enabled. This is done in cPanel under either MultiPHP INI Editor (enable zlib.output_compression) or Select PHP Version.
Speed Test Comparison
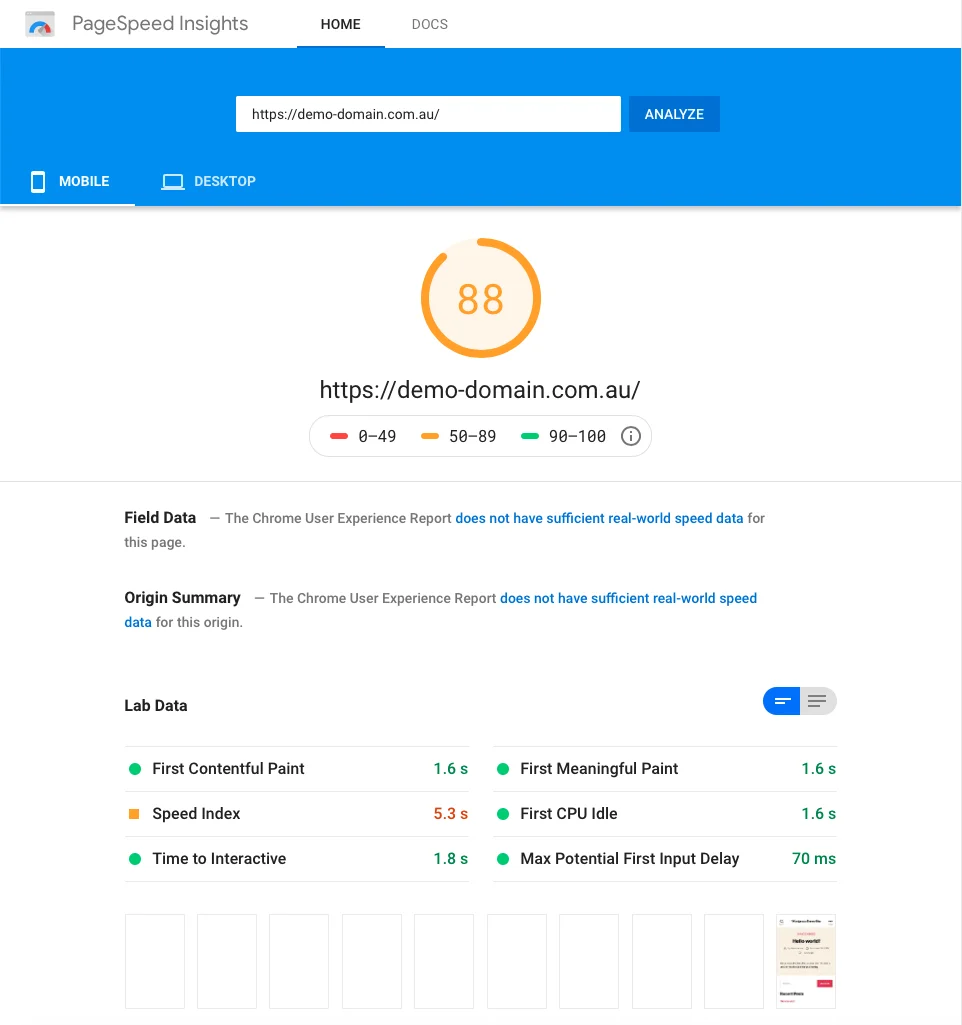
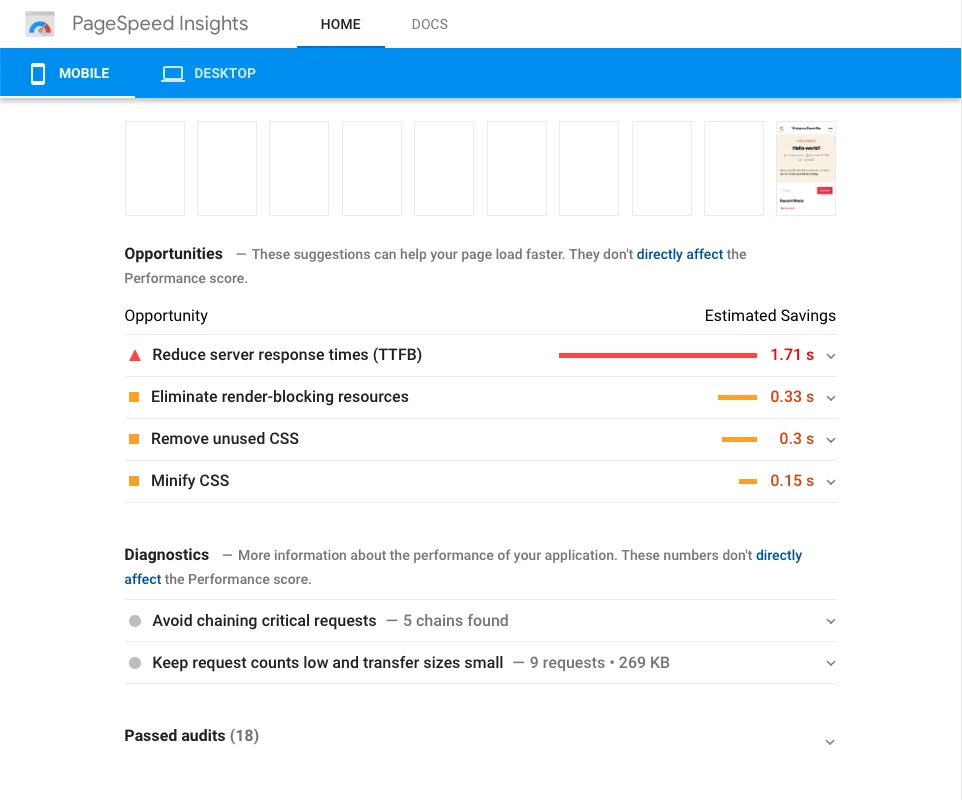
We ran a benchmark Google Pagespeed Insights test after installing a fresh copy of Wordpress. These were the results:
BEFORE
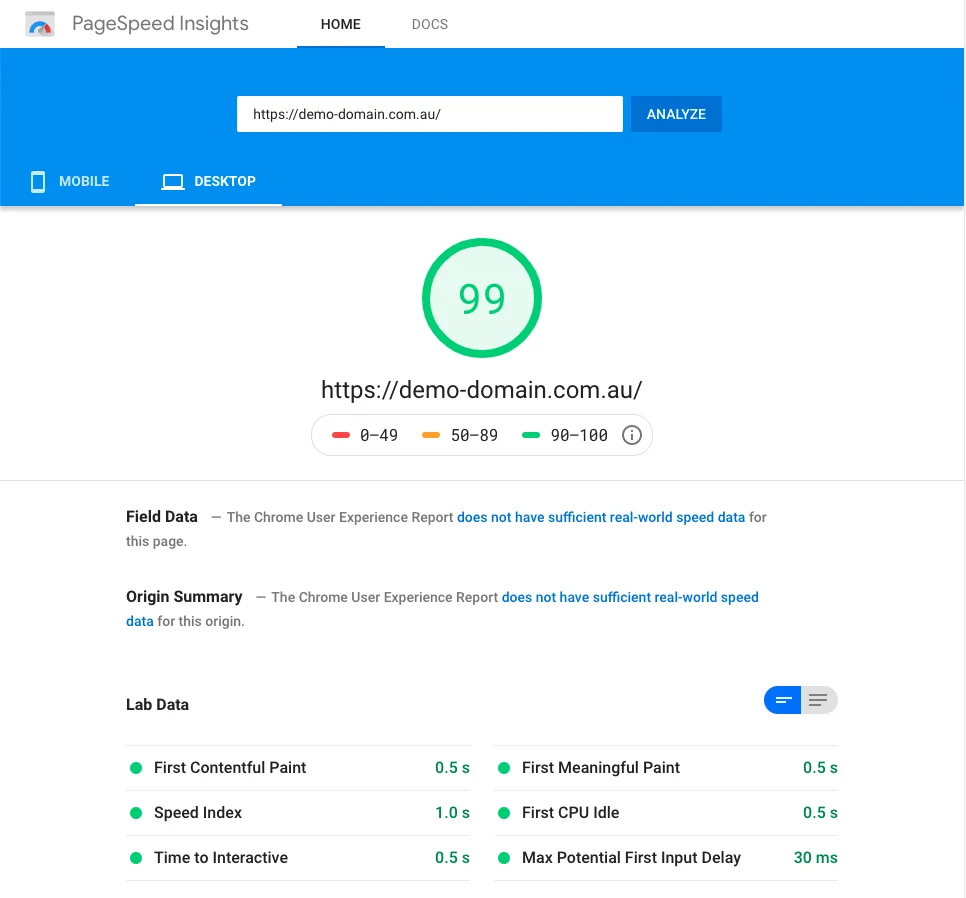
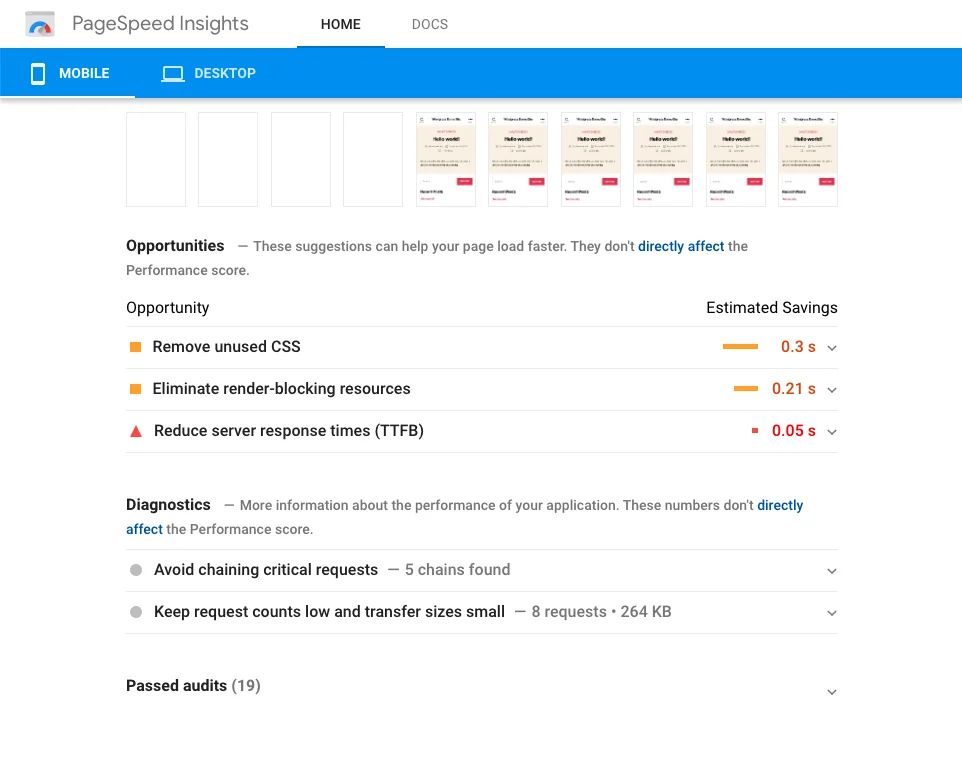
WP Fastest Cache was installed, and the options above selected. We loaded the page again in Pagespeed Insights, and these are the results:
AFTER
Conclusion
Install a caching plugin for an instant speed improvement for your Wordpress Website. Serversaurus recommends WP Fastest Cache. In our evaluations, WP Fastest Cache gets the best speedup and is very easy to configure. In our testing, WP Fastest Cache improved the Google Page Insights score for a default Wordpress installation from 88 to 99; improved the Speed Index from 5.3s to 1.0s, an 82% reduction; and Time to First Byte (TTFB) from 1.71s to 0.05s, a 97% reduction.
Published June 29, 2021. Last updated November 30, 2023.
Can't find what you're looking for?
"*" indicates required fields